|
I made this recently for a friends birthday, so I thought I would share with you guys how I made it! What you are going to need- a notebook - black paint - sticker paper which you can print on - a computer and printer - scissors Step 1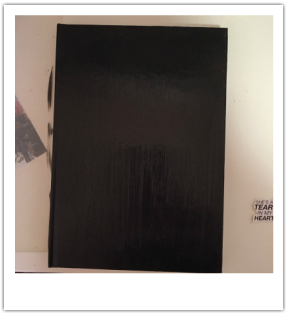 First paint your chosen notebook any colour you want. I chose black because it wouldn't distract the person from the stickers. While you wait for it to dry, you can start the other steps. Step 2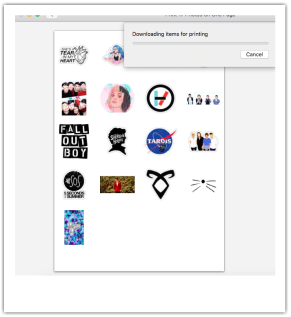 Find photos that you would like to put on your notebook. Since this was for a friend, I chose her favourite tv shows, music and youtubers. Step 3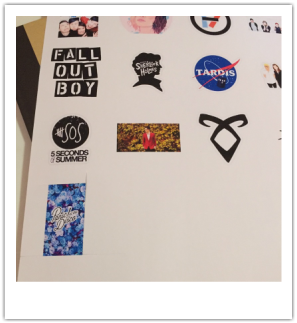 Once you have chosen all your pictures, size them appropriately. I chose to do them as contact size which you select as you print, or you could size each one to however big or small you want. Then print them out onto the sticker paper, following the instructions for your particular sort. Step 4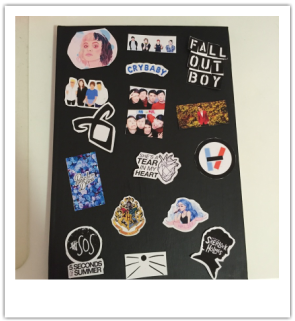 After you have printed them, start cutting out each one. If they are weirdly shaped then use an x-acto knife (if you have one) for more precision. Mine weren't too bad, so I just used scissors. After cutting them out, don't stick them straight onto the notebook. Position each one so you can see if it looks good. Step 5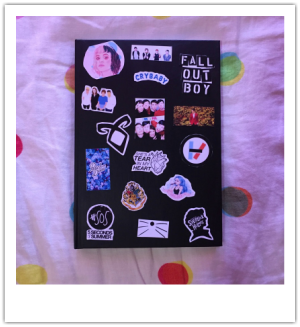 Stick each one down on the notebook and you're done! Hope you guys enjoyed this post! This is a really easy DIY which looks very effective, and it a great gift. You can customise this so it fits the person you are giving it to.
0 Comments
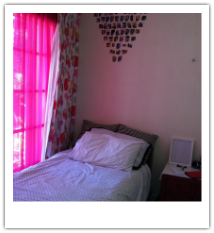
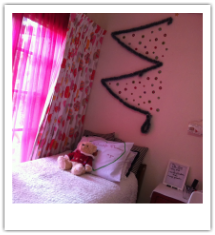
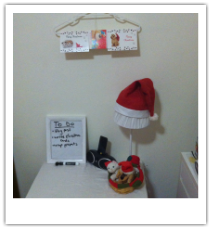
Hey guys, this is the last Christmas post for this year, so hope you guys enjoy! If you want any new series, comment them below and I might do them! For this Saturday, I will try my best to post, but if I don't I will do an extra post on Sunday or Monday. 1. Have a Christmas Movie Marathon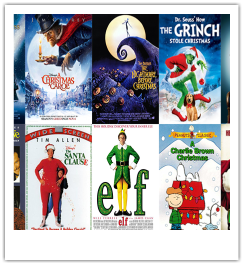 This is a good idea, so you can start to get festive. Movies also take a decent amount of time to be watched, so it will take up some of your day. Some movies I recommend are: Rudolph the red-nosed reindeer, Frosty the Snowman, The Santa Clause (1,2 and 3), Elf, A Christmas Carol, Home Alone, The Nightmare before Christmas and How The Grinch Stole Christmas. Also watch all your favourite tv shows Christmas specials! 2. Make some cookies!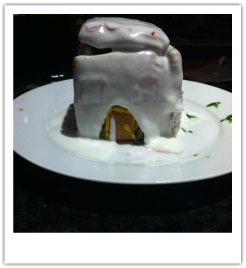 This is a good idea, so you can have something to eat while you watch the movies, or you can save it for Christmas! I have a recipe for this on my blog, so it will be linked below. 3. Do a Christmas activity off my blog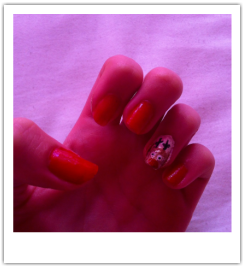 There are a few things that you could do that are on my blog. Like nail art, DIY decorations. You could also search up some festive things on pinterest and try make them. 4. Have a festive photo shoot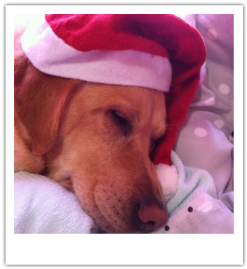 You could do this with your friends, family or even pets! Just set up a background and get some festive hats, and you are good to go! This photo is of my dog Daisy. Don't forget to listen to Christmas music as well! 5. Learn to play a Christmas Song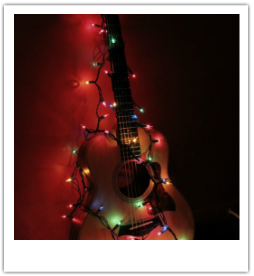 If you own a guitar, keyboard, trumpet, any instrument, it would be fun and festive to learn a Christmas song. You could also show it to your family on Christmas. I will link a website with how to play Christmas songs below. (also I didn't take this picture) Hope you guys enjoyed this post!
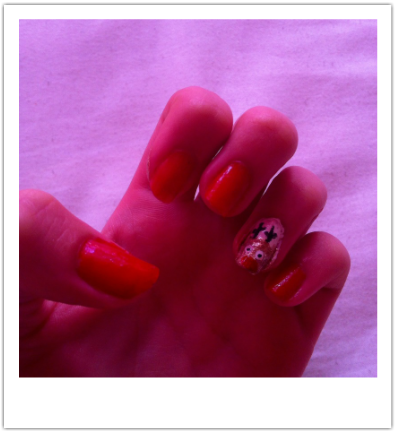 What you're gonna need -Red nail polish -Brown nail polish -White nail polish -Black nail polish -White nail polish -Striper (or a small paintbrush -Nail dotter (or the end of a bobby pin)  Step 1 Paint all your nails red, except for both your ring fingers, which will be white instead. 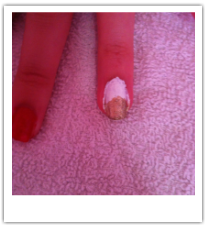 Step 2 Make sure your nails are completely dry before you start the next step. So now you want to paint a brown semi circle on your ring finger. This will be the start of the reindeer. 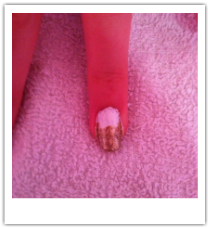 Step 3 Now you want to add two ears on the ends of your finger nails, with brown nail polish. 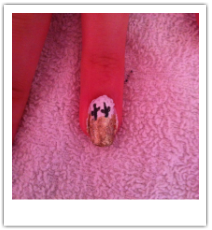 Step 4 Now we are going to do the antlers. So you are gonna need your black nail polish and striper for this. First draw two straight lines on the head. Then draw a few more lines on those lines you just painted. 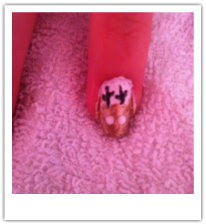 Step 5 Now for the eyes. First use a bobby pin to dot a white circle on the reindeers face. Then use another bobby pin, but this time with black. Try not to press as hard as you did on the first one, so you can make a pupil. 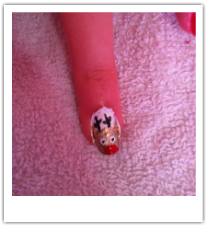 Step 6 The last thing you need to do is make Rudolph's nose. Get the same red polish as before, and make a semi circle shape at the bottom of the face. Then just add a top coat, and you're done. This last week we got 150 views on this blog! Thank you everyone for staying with me on this blog. Also for next week I will be doing an extra Christmas post, on Wednesday, as Christmas is on Friday. I will try my best to upload on Saturday, but I might not.
Before After
Before After
Before After
1. Half a Christmas Tree Decoration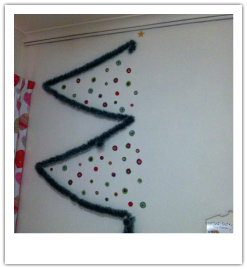 Materials -Green tinsel -Wrapping paper -Yellow paper -Hooks Instructions Step 1: First you want to stick the hooks on in a zig zag pattern. Step 2: Now put your tinsel over the hooks, this will be your tree. Step 3: Cut out a star from yellow paper and stick it on the top of the tree. Step 4: Cut out different sized circles from wrapping paper to be the baubles. Step 5: Stick the baubles around the inside of the tree. And you're done! 2. Christmas Pillow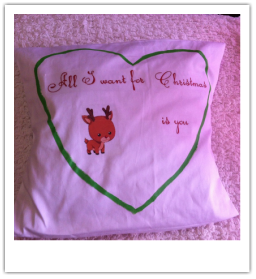 Materials -White pillow case -Pillow -Photo transfer paper -Printer -Computer Instructions Step 1: Make a pillow case or find one that you already have. I have another post on how to make a pillow case, so I will link that at the bottom. Step 2: Find an image you want on your pillow. Make sure you remember to mirror the image, so it comes out the right way on your pillow. Once you have done this make sure it's the right size for you pillow case. Then print it out on your transfer paper. Step 3: Now you want to cut out your image. Then iron it onto your pillow case. And you're done! 3. Christmas Count-Down Materials -Clear box or a shadow frame -Wrapping paper -Normal paper -Mini baubles -Black paper -White Board Marker Instructions Step 1: First you want to cover the inside with wrapping paper. Step 2: Now glue in your baubles and other decorations. Also glue a piece of paper to the front so you can write the days left till Christmas. Step 3: Now you want to close the top and cover the outside with wrapping paper, but don't forget to leave the front with nothing. Now you can write the days left till Christmas! 4. Christmas Card Holder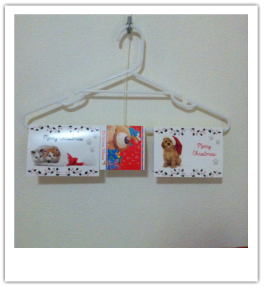 Materials -Coat Hanger -Christmas Cards -Hook Instructions Step 1: Put the hanger on the hook Step 2: Place the Christmas cards on the hanger And you're done! 5. Wrap or Gift Bag Things!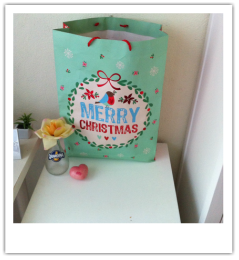 If you have a lot of things you don't know where to put, then this is perfect for you! Materials -Gift Bag -Things to put in it Instructions Step 1: Gather together some random things Step 2: Put them in a gift bag! Also if you have some picture frames on the wall, you can wrap them and your room will instantly look festive! Hope you guys enjoyed this post! Next Wednesday I will be showing you everything in my new bag.
This post is more random than the last one, as I will be saying websites, subscription boxes and other stuff. I have linked all the websites below the list.  1. Red Bubble This is a really easy way to get someone something that is related to their favourite show, game, band or anything really! You can also look through other designs that people have made, that you wouldn't be able to find anywhere else. 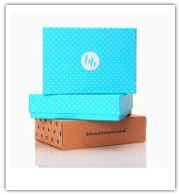 2. A subscription box I got the BellaBox for my birthday this year, and it is a great gift! You get something each month, so it's like it's always Christmas! On the website you can get a Bellabox, a BelloBox (for men) or a BellaBaby! So there are lots of options.  3. Body Shop Things The body shop has a lot of Christmas packages, so I recommend getting one of those. 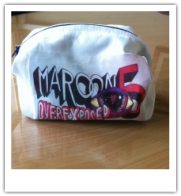 4. Homemade things I have a few tutorials on how to make a few things in the DIY's category on the side bar. This is good as you can customise the design and do whatever you want with it.  5. Spotify premium
For whoever loves music and doesn't have premium. This is a great present, because the person will probably use it everyday, so it would be handy. The best thing is that it is on sale right now for $0.99 for three months! 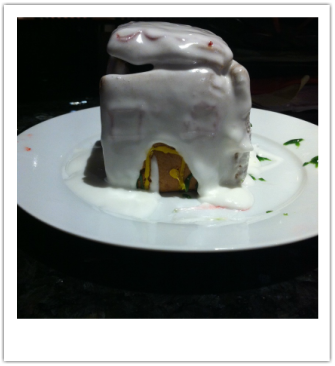 Hey guys I thought I would try something different, so this is how you make gingerbread cookies. Ingredients- 1/2 a cup of butter - 1/2 a cup of brown sugar - 1/2 a cup of golden syrup - 1 egg (separated) - 2 and a 1/2 cups of plain flour - 1 tablespoon of ground ginger - 1 teaspoon of mixed spice - 1 teaspoon of bicarbonate of soda - Icing Sugar -Food Colouring -Sprinkles and other stuff to decorate. Method Step 1 Preheat the oven to 180' Celcius. 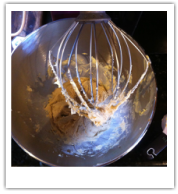 Step 2 Using an electric mixer, mix the butter (1/2 cup) and the brown sugar (1/2 cup) together, until it looks pale and creamy.  Step 3 Add in the golden syrup (1/2 cup) and an egg yolk into the mix. Mix until combined. 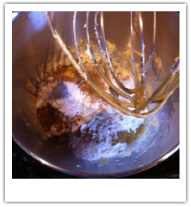 Step 4 Now stir in the flour (2 1/2 cups) , ginger (1 tablespoon), mixed spice(1 teaspoon) and bicarbonate of soda (1 teaspoon). Don't use the electric mixer for this part. 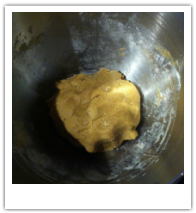 Step 5 Make sure you knead the dough for a bit to make sure everything is combined. It might seem that it won't work, but you just have to stay with it. You can leave it in the fridge for 30 minutes, but I decided not to. 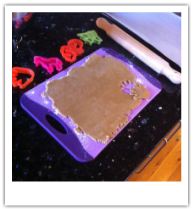 Step 6 Now is the fun part. Roll out half your dough on a floured surface with a rolling pin. Then use cookie cutters to cut out some shapes. 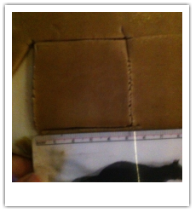 Step 7 Now you want to measure out your gingerbread house. You will need seven squares and I decided to do 5cm x 5cm for them. Cut one of the squares in half to make triangles for the roof. 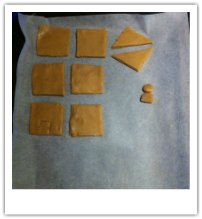 Step 8 Once you have all your shapes cut out, put them in the oven for 10 minutes. When they finish turn off the oven and leave them in there to harden. Then take them out and put them on a cooling rack and wait for them to completely dry before putting the icing on them. 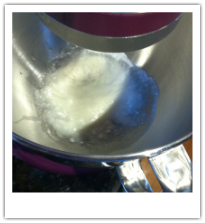 Step 8 Now we are going to make the icing. Get the left over egg white from before and about a cup or so of icing sugar into an electric mixer, and mix until combined. 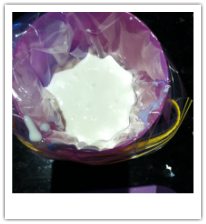 Step 9 Get a cup and a zip lock bag and place the bag into the cup. Then put the icing into the cup. 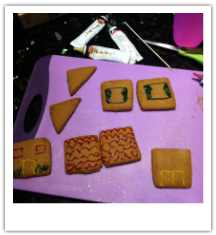 Step 10 Cut a small hole in the end of the icing bag. Now you can start to decorate and put together your gingerbread house. I decorated everything with some coloured icing before I started to join it together, but I recommend doing this after you have assembled the house. 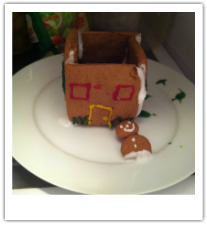 Step 11 Now you want to stick two of the sides together with icing. This is quite hard to do, so when you have balanced the two sides, put it into the fridge for at least 15 minutes to harden the icing. Step 12 After taking your house after the fridge, you now need to attach one or both of the other sides. This could take some time, but it will be worth it. Then after you have balanced them, you should put it all back into the fridge. Step 13 Now that you have all the sides connected you can start to connect the roof. So first you want to connect the triangles. I couldn't do this because I didn't leave the house in the fridge for long enough. So once you connect the triangles, put it in the fridge again. If you can't connect the triangles, then you can just put one of the roof pieces on top of the house. Step 14 So once you have the triangles connected now you want to connect the roof pieces to the triangles. So just put some icing on the edges and place on the roof pieces. I don't have any photos of this because I didn't do this. 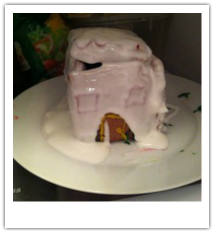 Step 15 Now you can put white icing all over the house, like I did, to give a snowed on look. Hope you guys enjoyed this, even though my ginger bread house didn't turn out very good, but that's okay. :)
I thought this week I would start my Christmas posts! Every week up till Christmas, I will be doing one Christmas post! So this week I will start with part one of my Christmas Present Ideas. So all of these will be suited to different sorts of people and you can customise it as much as you want to suit the person you're giving them to. Movie Person PackSo first you want to decide what movie theme you're gonna choose. For this example I chose Star Wars. So what you want to get is: -The movie (so the whole Star Wars collection) -Microwave popcorn bags -A warm blanket -Lollies -A pop figure or anything related to the movie. You can choose any movie or tv show that you want to use for this idea. Music Person PackSo for the music person, you also need to pick a theme. Their favourite band or singer. For this example I chose Maroon 5. So what you want to get it: -Headphones -Cd/record (I chose Maroon 5) -T-shirt of their favourite band -Ipod (if that's in your budget) -Headphone securer Pamper KitFor the pamper kit you don't need a theme, but you need to know what sort of scents and colours the person likes. So you're gonna need: -A face mask -Bath bombs/bubble bars -Scented candle -Bath pillow -Nail polish -Nail polish remover Hope these ideas helped you guys! Also all of the photos have not been taken by me. I will be doing a part 2 and maybe 3 in a few weeks.
|
AuthorHi it's Elise :) I post every Saturday, so check in then to see new posts. Archives
June 2017
Categories
All
|
 RSS Feed
